Route Animation
To animate a route, we have the option to animate the complete route, or animate step by step.
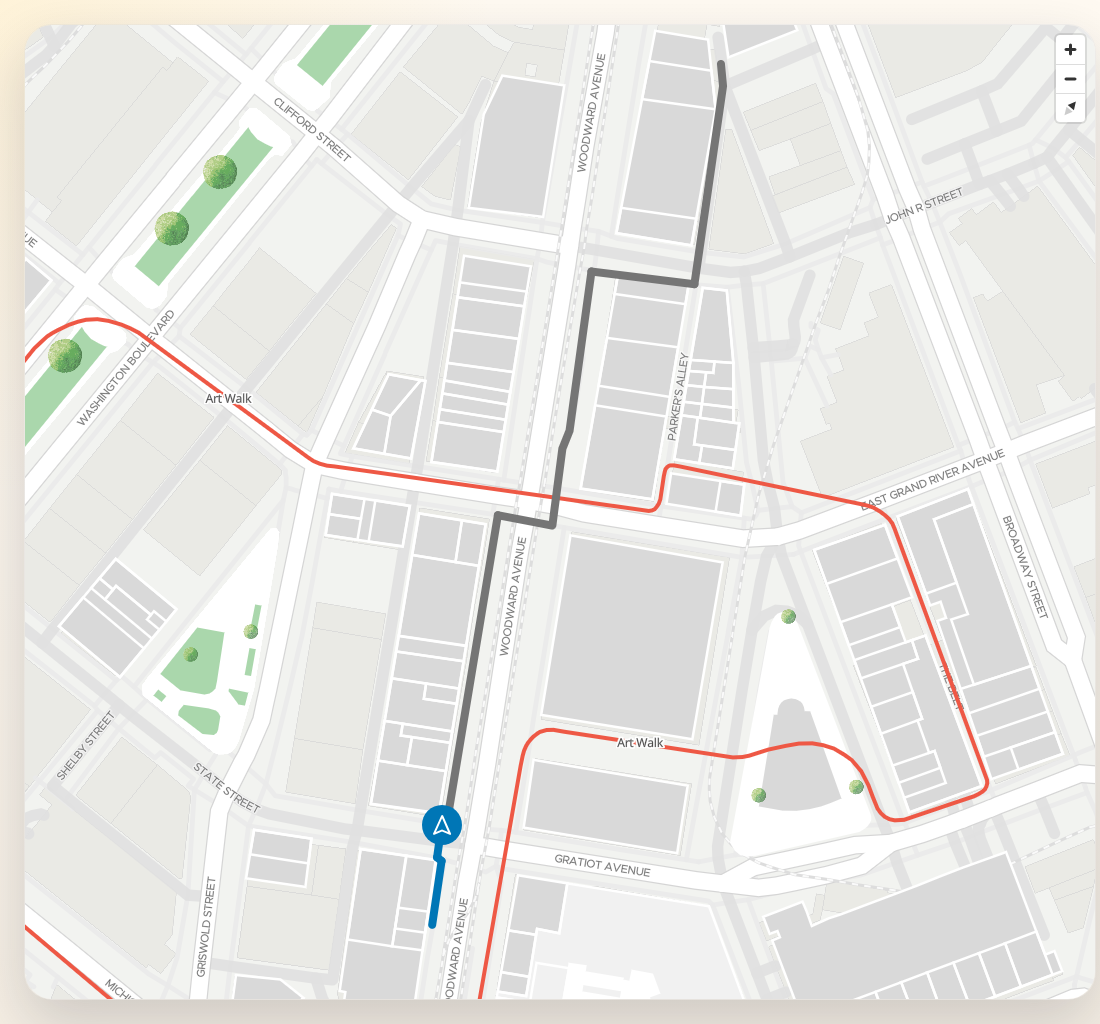
Below is a demo of the route animation in action, with customizable colors and a personalized icon:
Style animation

Both options use the same interface to configure the style used to draw the route on the map.
The AnimationDrawingConfig lets you configure:
aheadPathStyle— style for the route ahead of the icon (default: gray)behindPathStyle— style for the route behind the icon (default: blue)polylineWidth— line width in pixels (default: 10)routeIconConfig— customize the default arrow icon colorsrouteIcon— provide a completely customHTMLElementas the route icon
Custom route icon
You can use the default arrow icon with custom colors:
const drawConfig: AnimationDrawingConfig = {
  aheadPathStyle: { type: "Solid", color: "#757575" },
  behindPathStyle: { type: "Solid", color: "#0076B6" },
  routeIconConfig: {
    backgroundColor: "#E53935",
    arrowColor: "#FFFFFF",
  },
}
Or provide a fully custom icon (e.g., a car or wheelchair image):
const carIcon = new Image(40, 40)
carIcon.src = "path/to/car-icon.svg"

const drawConfig: AnimationDrawingConfig = {
  routeIcon: carIcon, // Takes precedence over routeIconConfig
  aheadPathStyle: { type: "Solid", color: "#757575" },
  behindPathStyle: { type: "Solid", color: "#0076B6" },
}
Animate complete route
On this animation you can start the animation, pause and resume the animation, and restart a already started animation.
V1 vs V2 route data
Both startAnimateRoute and
addStepAnimation accept either a
GetRouteConfiguration or an already-fetched MVXRoute. Each
also has a V2 counterpart —
startAnimateRouteV2 and
addStepAnimationV2 — with the exact same signature and
AnimationDrawingConfig/AnimationConfig options. The only difference is which backend route
endpoint is used to fetch the route data when you pass a GetRouteConfiguration (the same
distinction as getRoute vs
getRouteV2).
If you already fetched the route with getRouteV2 (or the V2 animation method) and pass the
resulting MVXRoute object into startAnimateRoute/addStepAnimation instead of a
GetRouteConfiguration, no new request is made — the V1/V2 distinction only matters at fetch time.
Use whichever endpoint your backend routing setup expects; check with your MapVX contact if you’re
unsure which one is enabled for your token.
Start animation
To start the animation, you need to use startAnimateRoute.
This function receive three arguments:
- The first correspond to a
GetRouteConfigurationto define the route to animate. - The second correspond to a
AnimationDrawingConfigto define the style used to draw the route during the animation. A difference from the style used onaddRoute, in this you can configure two RouteStyle, one for the path before the icon representing the user, and one for the path ahead of the icon. - The third argument correspond to a
AnimationConfig. In this you can configure the animation of the route, for example define the time used to animate each step, the time used to rotate the icon, define a callback function to know what step is being animated, etc. For more details revise the documentation available onAnimationConfig.
This function return the information of the route being animated as a
MVXRoute.
A example using all this will be:
const route = await map.startAnimateRoute(
  config,
  {}, // Use default configuration
  {
    iconRotationTime: 1,
    callBack: ({ isFinished, step }) => {
      if (isFinished) {
        console.log("I know that the animation finished")
      } else {
        console.log("Started to animated step ", step)
      }
    },
  }
)
Pause and resume the animation
You can pause the animation at any time with
pauseAnimateRoute.
This will pause the ongoing animation.
If this method is called when there isn’t a ongoing route animation on the map, like:
- There isn’t a route on the map.
- There is a route on the map, but was added with
addRouteoraddStepAnimation - There is an already paused route.
- There is an already finished route.
It will throw a Error. This method only function with the animation started with
startAnimateRoute
Resume the animation
You can resume a paused animation with resumeAnimateRoute.
Only function with a animation paused by pauseAnimateRoute,
else will throw a Error.
Restart the animation
You can restart a animation at any time with
restartAnimateRoute.
Only function with a animation added by startAnimateRoute,
else will throw a Error.
Animate step by step
You can also animate a route step by step using
addStepAnimation. This will animate only a step at a time.
Add the step by step animation
You start adding the step animation using addStepAnimation.
This will add the route prepared to animate the first step of the route. The marker always start with bearing 0.
This function use similar arguments that startAnimateRoute
with the difference that in addStepAnimation is permitted to
pass the information of an already obtained route as the first arguments.
For example, is you animated a route with startAnimateRoute
and know you wish to show a step by step animation, inverting the default colors for the paths, it
will be
const newRoute = await map.addStepAnimation(
  route, // The route information already obtained with startAnimateRoute
  {
    behindPathStyle: { type: "Solid", color: "#757575" },
    aheadPathStyle: { type: "Solid", color: "#0076B6" },
  },
  {
    iconRotationTime: 1,
    callBack: ({ isFinished, step }) => {
      if (isFinished) {
        console.log("I know that the animation finished")
      } else {
        console.log("Started to animated step ", step)
      }
    },
  }
)
Animate to next step
To animate the current displayed step, you need to call
nextStepAnimation.
The animation starts by rotating the icon to align it with the path of the step, and then moving along the route until it has completed the entire step.
Return to previous step
To return to a previous step, you need to call
previousStepAnimation.
This will change the display as if you have finished to animate the before previous step, and if you
call now a nextStepAnimation, it will animate the previous
step.
Animation configuration options
All timing and behavior options are set through AnimationConfig,
the third argument to startAnimateRoute and addStepAnimation.
| Property | Type | Default | Description |
|---|---|---|---|
stepTime | number | 3 | Time in seconds to animate each step. |
minimumSpeed | number | 40 | Minimum speed in m/s. When the calculated speed for a step falls below this value, this value is used instead. Prevents very short steps from animating too slowly. |
changeFloorTime | number | 0 | Time in seconds to pause when the animation crosses a floor boundary. Useful for showing a floor-change indicator before the route continues on the new floor. |
iconRotationTime | number | 0 | Time in seconds to rotate the icon when the route changes direction. |
keepFixedBearing | boolean | false | When true, the camera follows the animated marker but does not rotate with the route direction. Only the icon rotates. |
callBack | (status: AnimationStatus) => void | — | Called at the start of each step and once more with { isFinished: true, step: null } when the animation completes. |
autoFitByPlace | { enabled: boolean; padding?: PaddingOptions } | — | Automatically adjusts the map view when the animation enters a new building or place. Disabled by default. |
Controlling animation speed
Use stepTime and minimumSpeed together to tune pacing. stepTime sets the target duration per
step, but if the step is so short that the resulting speed would fall below minimumSpeed, the
minimum speed caps the animation instead.
const route = await map.startAnimateRoute(
  config,
  {},
  {
    stepTime: 5, // Each step takes up to 5 seconds
    minimumSpeed: 20, // Never slower than 20 m/s on very short steps
  }
)
Step by step without map rotation (totems / kiosks)
By default, the camera rotates to follow the direction of the route during the animation. For fixed installations such as a totem or kiosk, you usually want the opposite: the screen orientation stays constant and only the user icon rotates to indicate the current direction. See Map Controls and Bounds for the totem/kiosk orientation setup this builds on.
This combines two independent flags:
rotateEnabled: falseoncreateMap, so the visitor (or the totem itself) cannot rotate the map. Zoom and pinch-to-zoom keep working.keepFixedBearing: trueon theAnimationConfig, so the camera keeps following the animated icon without rotating the map to match the route bearing.
const map = sdk.createMap(container, {
  center,
  zoom: 18,
  bearing: 0, // north always up
  rotateEnabled: false, // the user cannot rotate the map, pinch-to-zoom still works
  showCompass: false,
  showZoom: true,
})

const route = await map.addStepAnimation(
  routeConfig,
  {},
  {
    keepFixedBearing: true, // the camera follows the route but the map does not rotate
    stepTime: 3,
    iconRotationTime: 0.6, // only the user icon rotates
    callBack: ({ isFinished, step }) => {
      if (!isFinished) {
        updateInstructionPanel(step.plainInstruction)
      }
    },
  }
)

// Move forward / backward through the steps
map.nextStepAnimation()
map.previousStepAnimation()
keepFixedBearing works the same way with startAnimateRoute
for a full-route animation.
Pausing on floor changes
Set changeFloorTime to give users a moment to see the floor-transition indicator before the
animation continues on the new floor.
const route = await map.startAnimateRoute(
  config,
  {},
  {
    changeFloorTime: 2, // 2-second pause at each floor transition
    iconRotationTime: 1,
  }
)
Tracking animation progress with callBack

The callBack receives an AnimationStatus object on every step and
once more when the animation finishes. Use it to update a turn-by-turn instruction panel or trigger
other UI changes.
const route = await map.startAnimateRoute(
  config,
  {},
  {
    callBack: ({ isFinished, step }) => {
      if (isFinished) {
        showArrivalBanner()
      } else {
        // step includes instruction text and distance for the current segment
        const instruction = step.htmlInstruction || step.plainInstruction || step.maneuver
        const distance = `${step.distance.toFixed(0)}m`
        updateInstructionPanel(instruction, distance)
      }
    },
  }
)
Showing a floor-change banner
When a route crosses floors, each MVXRouteStep carries
startInsideFloor and endInsideFloor. Comparing them lets you detect transitions and show a
banner or modal before the map moves to the new floor.
Relevant step properties for floor transitions:
| Property | Description |
|---|---|
startInsideFloor | Floor ID where the step begins |
endInsideFloor | Floor ID where the step ends |
htmlInstruction | HTML-formatted instruction text (e.g. “Take the elevator to Floor 2”) |
elevatorStep | true when the step involves an elevator |
showPopup | true when the backend recommends displaying a popup |
The typical pattern combines changeFloorTime (to pause the animation automatically) with the
callBack (to show your custom UI during the pause):
const route = await map.startAnimateRoute(routeConfig, drawConfig, {
  changeFloorTime: 3, // Pause 3 seconds on floor transitions
  callBack: ({ isFinished, step }) => {
    if (isFinished) {
      hideBanner()
      return
    }

    // Detect floor transition
    const isFloorChange = step.startInsideFloor !== step.endInsideFloor || step.showPopup

    if (isFloorChange) {
      showFloorChangeBanner({
        instruction: step.htmlInstruction,
        isElevator: step.elevatorStep,
        fromFloor: step.startInsideFloor,
        toFloor: step.endInsideFloor,
      })
    } else {
      hideBanner()
    }
  },
})
For step-by-step animations, you have full control over when to advance. This lets you pause
indefinitely on a floor change, show a confirmation dialog, and only call nextStepAnimation after
the user dismisses it:
const route = await map.addStepAnimation(routeConfig, drawConfig, {
  callBack: ({ isFinished, step }) => {
    if (isFinished) return

    if (step.startInsideFloor !== step.endInsideFloor) {
      showFloorChangeDialog(step.htmlInstruction, () => {
        map.nextStepAnimation(route.id)
      })
    }
  },
})
Auto-fitting the map to the current building
When a route crosses multiple buildings, autoFitByPlace re-fits the map view each time the
animation enters a new place. Set enabled: true and optionally provide
PaddingOptions to control the inset around the fitted bounds.
const route = await map.startAnimateRoute(
  config,
  {},
  {
    autoFitByPlace: {
      enabled: true,
      padding: { top: 100, bottom: 100, left: 80, right: 80 },
    },
  }
)
When padding is omitted, it defaults to { top: 150, right: 150, bottom: 150, left: 150 }.
Map view helpers
During a step-by-step animation the user may pan or zoom the map away from the active step. The SDK provides two methods to bring the camera back.
centerOnCurrentStepAnimation
centerOnCurrentStepAnimation moves the map
camera to the current icon position in a step-by-step animation. Use it as the action behind a
“Re-center” button in your UI.
// Center on the active step of the most recently added route
map.centerOnCurrentStepAnimation()

// Center on a specific route when multiple routes are on the map
map.centerOnCurrentStepAnimation(route.id)
fitRouteByPlace
fitRouteByPlace filters the route steps that start or end
inside a given building and fits the map bounds to show only those steps. This is the manual
counterpart to autoFitByPlace in AnimationConfig and is useful when you need to trigger the fit
yourself, for example when the user taps a building name in a sidebar.
// Fit the map to show only the steps inside building "building-abc"
map.fitRouteByPlace(route, "building-abc")

// With custom fit options
map.fitRouteByPlace(route, "building-abc", {
  padding: { top: 120, bottom: 120, left: 80, right: 80 },
  duration: 500,
  onComplete: () => console.log("Camera settled"),
})
FitOptions also accepts bearing and pitch to orient the camera as it
fits.
Complete step-by-step flow with center and fit
This example ties together step navigation, re-centering, and building-scoped fitting into a cohesive navigation UI:
const route = await map.addStepAnimation(routeConfig, drawConfig, {
  iconRotationTime: 0.2,
  callBack: ({ isFinished, step }) => {
    if (isFinished) {
      showArrivalBanner()
      return
    }

    updateInstructionPanel(step)

    // When the step enters a new building, fit the map to that building
    if (step.startInsidePlace !== step.endInsidePlace && step.endInsidePlace) {
      map.fitRouteByPlace(route, step.endInsidePlace, {
        padding: { top: 100, bottom: 100, left: 80, right: 80 },
      })
    }
  },
})

// Wire up UI controls
document.getElementById("btn-next")!.onclick = () => map.nextStepAnimation(route.id)
document.getElementById("btn-prev")!.onclick = () => map.previousStepAnimation(route.id)
document.getElementById("btn-center")!.onclick = () => map.centerOnCurrentStepAnimation(route.id)
Multiple simultaneous route animations
You can have multiple routes on the map at the same time. Each route gets a unique id that you can
use to manage animations independently:
// Animate two routes with different styles
const routeA = await map.startAnimateRoute(configA, {
  aheadPathStyle: { type: "Solid", color: "#757575" },
  behindPathStyle: { type: "Solid", color: "#0076B6" },
})

const routeB = await map.startAnimateRoute(configB, {
  aheadPathStyle: { type: "Solid", color: "#BDBDBD" },
  behindPathStyle: { type: "Solid", color: "#E53935" },
})

// Pause only route A
map.pauseAnimateRoute(routeA.id)

// Resume only route A
map.resumeAnimateRoute(routeA.id)

// Remove a specific route
map.removeRoute(routeA.id)

// Remove all routes
map.removeAllRoutes()